Using GPG keys with GitHub
Contents:
- What is a GPG key?
- How to generate a GPG key
- Using your GPG key with git
- Adding your public key to GitHub
What is a GPG key?
A GPG key is an implementation of the OpenPGP standard defined by RFC4880[1]. It allows you to encrypt and sign data - uses for GPG include E-Mail, Git Commit signing and general data encryption.
It works with simple keypair encryption, where a private key is used to encrypt data, which can later be decrypted by a public key, that is usually sent ahead of time to another user.
You can use this to digitally sign data, where only the correct private key can encrypt data that a known public key can access - so keys associated with certain users via email can prove data came from that user in question.
How to generate a GPG key
Before starting, make sure you have GPG tools installed, this is done by default on most Linux distributions, but not windows.
- Verify GPG works on your system with
gpg --version - Generate your keypair with
gpg --full-generate-key - Select what kind of key you want, for most situations the default - RSA and RSA is good enough
- Select the keysize you want, "the longer the better"[2]
- Select the duration of which the key is valid - unless you need an expiration date, you should be fine with the default
key does not expireoption - Enter in your user ID info as required
If you are planning to use this key on GitHub, make sure to use the email associated with your GitHub account
- Enter in a passphrase
- You're done! 🎉🎉
If you followed those steps, you should have a GPG key ready for use on your system. Read on to find out how to use it with git.
Using your GPG key with git
In most scenarios, I would suggest signing individual commits, and that is how I'm going to structure the next part of this post, but if you are interested in more info about signing work with git, here is the official documentation which you can read - https://git-scm.com/book/en/v2/Git-Tools-Signing-Your-Work
To sign individual commits manually you can type in the simple command
git commit -a -S -m "This is my signed commit" into the terminal, however doing this manually is quite a pain, given you need the additional flags.
Instead, you can set git to automatically sign commits with the commit.gpgsign option in git-config. You can set this in the terminal with the following:
git config --global commit.gpgsign true
and choose the key to sign with:
git config --global user.signingkey YOURKEYID
get your gpg key id with gpg --list-secret-keys and copy the string of text that appears
If you get an error in screen-reader based terminals, like the terminal in VSCode, either enable it in the settings with: Git: Enable Commit Signing or configure bash to read from terminal with: export GPG_TTY=$(tty) (this can be inserted into the appropriate file for bash settings)
Signing commits on GitHub
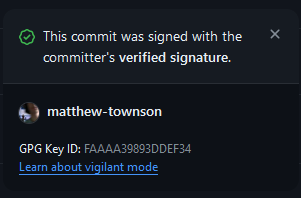
If you sign commits properly on GitHub, you'll get a nice "Verified" badge on each commit, with the ID of the key that was used to sign the commit!


To do this, follow these steps:
- Get your GPG key ID with
gpg --list-secret-keys - Export the public key with
gpg --armor --export YOURKEYID - Copy the public key including both
-----BEGIN PGP PUBLIC KEY BLOCK----- -----END PGP PUBLIC KEY BLOCK----- - Add the key to your GitHub account here
- That's it, your commits should now be signed.
Closing thoughts
Hopefully you now have commit signing working properly on your machine, it's useful for security and adds a little bit of flair to commits you make, which I think is cool.


